When contributing code to an app, usually you’ll be committing that code on a feature branch in git. In this guide, we will look at how to keep the projects commits in sync. We will also take a brief look into what git and GitHub are.
We can think of git as a command line tool that keeps track of all changes we make to our code. It’s common commands are git add, git commit, git push for saving changes. It’s what is known as version control.
After these commands are used to save the changes made to your files, the git push command will save the files into a code hosting platform such as GitHub. GitHub stores your files in repositories and allows users to share code easily.
Code hosting platforms such as GitHub make working remotely on projects together possible. As much of technology based jobs are migrating toward remote work, these solutions are more essential than ever.
When to Use git merge
Whether you’re working for a company with other developers, or contributing to open source projects for fun, you’ll be using the git merge command. It is important to point out to know exactly how your company or the open source project accepts commits. Ask around and read the guidelines of contributing before going any further with a project.
Typically, you’ll be tasked with working on a feature for an app. As such, you’ll be committing changes to your code on a feature branch. A feature branch is a branch that “branches” off the master branch. The master branch is where the final production code lives.
While in development mode, coding on the feature branch helps ensure the master branch is free from bugs that may arise while in development mode. Your feature branch should be named after the feature you’re creating. At this point, you are in your feature branch which is connected to and branches off of the master.
This chart is a good way to visualize how branches work.
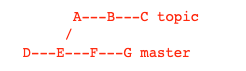
We can see two branches here: topic and master. The topic branch is the feature branch. A, B, and C are commits happening in time with C being the most recent commit on the feature branch. G is the most recent commit on the master branch.
This situation would occur if other teams made commits to the master branch after passing a code review. Since the latest version of the master branch is different from the version of the master branch on your machine (from git pull), we have version control issues. This could result in merge conflicts.
From your feature branch, you can use the git merge master command to merge the master branch into your feature branch. This will bring your version of master up to date, and once your code passes the code review, can use git push origin master to push the changes to the master branch.
Again, only push to the master branch once you have fulfilled all of the guidelines to contribute to the project. A best practice is to never push code directly to the master due to bugs or issues from untested code.
Conclusion
Being comfortable using git commands is a necessity for any developer. Knowing how and when to use specific commands will keep the latest version of your code saved and prevent merge issues with other branches.
When using git in the context of contributing to a company’s code base or open source projects, make sure to follow their guidelines. Each project will want to review your code differently, so following the guidelines especially when using git merge master is a necessity.
About us: Career Karma is a platform designed to help job seekers find, research, and connect with job training programs to advance their careers. Learn about the CK publication.