The jQuery addClass() method gives developers a way to change elements in a more global way. As the method name suggests, we can add a class attribute to a selected element. Why would we want to do this?
Let’s take an example of a web page that has some existing elements such as a title, a paragraph, and a button to click that does something. Along with this page is a stylesheet that uses these elements’ class name to style them. Upon clicking the button, existing content can change style, or appearance.
We could use the addClass() method to insert a new style attribute for the existing content after the button is clicked, which makes it possible to change the styling of existing content using only a line of code. Doing so allows the developer to think about manipulating elements in a styled fashion.
Let’s dive deeper into the example and look at how we might code it.
How jQuery addClass() Works
In our example, we are changing an object’s class attribute when our button is clicked. Before we get into this example code, let’s take a look at how addClass() works. Suppose we have this HTML:
<head>
  <meta charset="utf-8">
  <title>addClass demo</title>
  <style>
  p {
    margin: 8px;
    font-size: 16px;
  }
  .selected {
    color: blue;
  }
  .highlight {
    background: yellow;
  }
  </style>
  <script src="https://code.jquery.com/jquery-3.5.0.js"></script>
</head>
<body>

<p>Hello</p>
<p>and</p>
<p>Goodbye</p>
We are using <style> to include some basic styling for our <p> tag in the <head>. We’ve also included our jQuery API link. In the <body>, we have the words “Hello,” “and,” “Goodbye,” wrapped in three separate <p> tags. For us to see how addClass() works, let’s refer back to <style>.
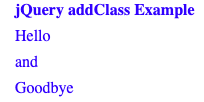
There are two classes inside <style>. One is “selected,” which renders an attribute of color to the color blue. The other class is “highlight.” This class renders a background attribute as the color yellow. Right now, we can see none of these styles are rendering:

The styles aren’t rendering because there aren’t any classes associated with our <p> tags. Rather than going into our HTML and manually writing classes to <p>, we can use addClass() to insert any or all class attributes on any or all <p> element.
<script>
$(document).ready(() => {
$('p').addClass('selected')
})
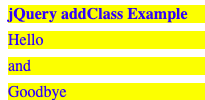
</script>Here, we are simply selecting all <p> elements and adding to them a class attribute of ‘selected.’ We expect all instances of our <p> elements to now render in the color blue.
Just as we expected! The jQuery addClass() method is able to accept more than one class attribute as a single argument. For example:
<script>
$(document).ready(() => {
  $('p').addClass('selected highlight')
})
</script>
Notice the syntax of including both classes wrapped in one set of parentheses. This renders our <p> elements in both blue and with a background of the color yellow.
Now that we’ve seen how addClass() can add class attributes to elements, let’s return to our original example with a button.
Using jQuery addClass()
Here we’ve added a button to our first example:
<head>
  <meta charset="utf-8">
  <title>addClass demo</title>
  <style>
  p {
    margin: 8px;
    font-size: 16px;
  }
  .selected {
    color: blue;
  }
  .highlight {
    background: yellow;
  }
  </style>
  <script src="https://code.jquery.com/jquery-3.5.0.js"></script>
</head>
<body>
<p>
<strong>jQuery addClass Example</strong>
</p>
<p>Hello</p>
<p>and</p>
<p>Goodbye</p>
<button>
Click to add class
</button>
The above code now renders a button, but it doesn’t do anything yet. In the previous example, we changed all of the <p> tags at the same time. Now let’s change only one element when the button is clicked. We could do this by incorporating the jQuery click() method.
As a quick review of the click() method, we call it on the object selector we want to attach an event listener to. Then we pass click() a callback function as an argument. Remember that a callback function is just a function we pass as an argument to execute later. In this example, the callback function will execute once the button is clicked.
Let’s see it in action!
<script>
$('button').click(() => {
 $('p').last().addClass('selected')
})
</script>
In the callback function, we are selecting the <p> elements and calling last() to find the last instance of <p>. From here, we add the class attribute of ‘selected.’ We expect the last <p> element which refers to the word “Goodbye” to change color to blue once the button is clicked.
Let’s click the button and find out.

Exactly what we expected to see! We’ve seen how jQuery addClass() can be used generally through changing all <p> elements to the styled classes as soon as the page loads. We’ve also seen how addClass() can be used with other jQuery methods such as click() to specifically change the class attributes of one <p> element once the selected button is clicked.
Conclusion
Today, we’ve learned what jQuery addClass() is and how it works. We’ve also learned that addClass() is extremely flexible in scope and can change multiple class attributes at once. The above examples are meant to be basic illustrations of possible uses for jQuery addClass(). To go further, experiment on your own and find ways addClass() is useful to your web app.
About us: Career Karma is a platform designed to help job seekers find, research, and connect with job training programs to advance their careers. Learn about the CK publication.